DIY repair of spring mattresses. How to repair spring mattresses with your own hands.
Unfortunately, almost everything breaks down sooner or later. And the mattress is no exception. But if you want, then you can fix most of the breakdowns with your own hands.
As you know, nothing lasts forever in this world, this also applies to orthopedic mattresses. Despite the fact that this product can serve you for many years, sooner or later, and it may require repair. If your mattress is dear to you and you do not want to purchase a new one, you can easily repair the mattress with your own hands without any special material and physical costs.
- Deterioration of the casing.
- Old stains that cannot be removed.
- Spring deformation.
- Thinning of internal filler.
- Violation of the integrity of the structure.
If your mattress has one or more of the above problems, you should try to fix them as soon as possible. Timely repairs can extend the life of your mattress by several more years.
Getting started repair
When starting to repair an orthopedic mattress, you must immediately decide on the necessary tools and materials for work. The choice of tool depends on the damage to the product. For example, if only the casing is damaged, you need to stock up on glue and fabric in the color of the product, if the springs are deformed, you need to prepare spare springs, and in case of wear of the filler, you will need a new filler, which you can purchase at specialized points of sale.
Self repair
For a major overhaul of an orthopedic mattress, you will need not only the necessary set of tools and materials, but also a sufficient amount of time, as well as free well-ventilated space. An ideal option can be a free space in the open air, because the mattress, like upholstered furniture, accumulates a lot of dust, which means that repairs in a closed room will be problematic.
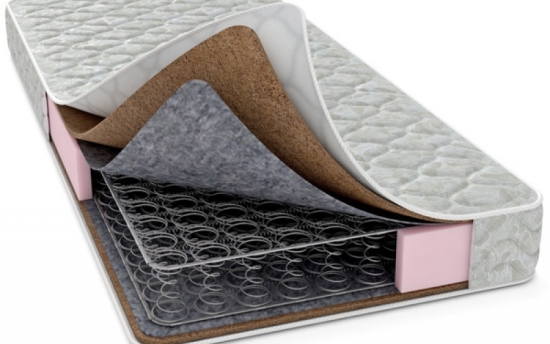
First of all, it is necessary to remove the covering from the mattress. To do this, you need to open the edging tape on one side of the product and remove the cover. Next, you need to carefully inspect all the springs and identify deformed ones, as well as assess the condition of the filler, if it is worn out, it will need to be replaced. Having identified unusable springs, they also need to be replaced with new ones. This is not at all difficult to do. In order for the new springs to firmly hold in the mattress, they must be sewn into separate bags or attached to neighboring springs using a wire.
After completing all the internal repairs, assess the condition of the cover. Holes and scuffs on the cover must be sealed with patches, then sew up the cover and replace the edging tape. At this, the repair of the mattress can be considered complete. Repairing a springless mattress takes less time; to repair it, you just need to replace the worn out layer of filler.
If old spring mattress on your bed has fallen into complete disrepair, do not rush to throw it away - let's try to repair it, especially since the repair of spring mattresses at home does not require any special skills and the presence of specialized and rare tools.
Classic mattresses are simple enough, so anyone who knows how to hold a hammer can repair them. The biggest challenge is tying the springs to keep them level and flat.
With our review, you will find out:
- What is needed for the repair;
- How to prepare for the repair;
- How to complete the bulk of the work.
There is nothing complicated here, so you can complete the repair in just 2-3 hours, saving money on repairs. And for those who want to make an orthopedic mattress with their own hands, there are detailed instructions on our website.
Preparing for repair
What tools and materials will we need to carry out the repair? There are not so many of them:
- Nails 50-60 mm;
- Strapping cord;
- New upholstery;
- Durable fabric for interior upholstery;
- Padding material (lies between the insulating layer and the upholstery);
- Wooden slats 20 mm thick and 60-100 mm wide;
- Serviceable springs from another mattress.
The hardest part here is finding the springs from another mattress., since it is more and more difficult to find them every year, since old mattresses are increasingly ending up in a landfill. Everything else is not a problem to find.
The next preparatory step is to disassemble the mattress. It must be placed with the base up and begin to remove the upholstery by removing the mounting brackets. If the fabric is old, then you just need to tear it off and throw it away, since the upholstery must be whole and strong. As soon as the upholstery is removed, we will see the spring blocks, between which dust has accumulated (we remember that such mattresses act like blacksmith bellows)
We will remove dust with a powerful vacuum cleaner. We thoroughly vacuum the fabric, try to get between the springs, removing all dirt from there. In general, do-it-yourself repair of a spring mattress is recommended to be carried out on the street or in a non-residential ventilated area, for example, in a garage. So we get rid of the effects of flying clouds of dust.
Repair of a spring mattress
After we have disassembled the mattress, it must be turned over with the wooden base down, that is, return it to its working position. We begin to examine the springs, return them to a vertical position. We cut out the broken springs and throw them away, install new ones in their place. We fix the loose springs on the base - if belt fasteners are used here, it should be removed by securing the springs with nails.
If one of the spring blocks that make up the spring mattress becomes unusable, it should be completely replaced using the spring block from another mattress.
After we align all the springs, we you need to make sure that their tops form a flat surface - their height must be the same. If this is not the case, we throw out the deformed springs, replacing them with new ones, since the mattress should be flat, without deflections.
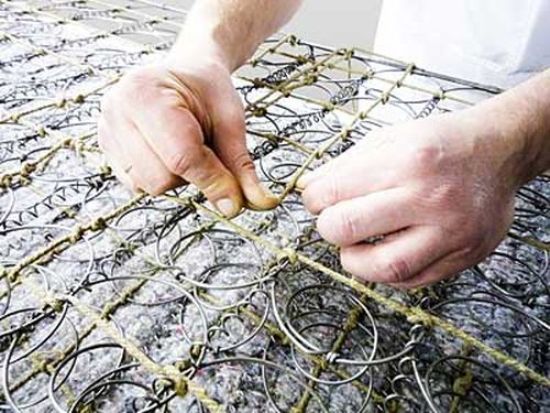
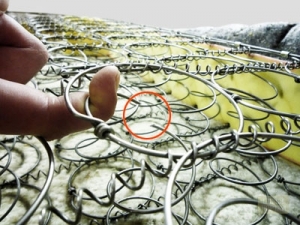
At the next stage of repairing a spring mattress, we need to re-tighten the springs. To do this, we stuff the slats on the wooden base, passing them along the perimeter of the sofa. We drive nails into the slats - one nail opposite each row (the nails should be driven in 2/3 of their length and slightly bent, since the cord will be tied to them).
First of all, we need to secure the transverse rows by passing each spring with a cord. During strapping make sure that the springs do not twist and do not rub against each other... After that, we move on to the longitudinal rows, and finish the process with a diagonal strapping - now our mattress has a completely stable and even surface.
We cover the spring blocks with a dense and durable fabric, for example, a tarpaulin or two layers of dermantine (burlap is also suitable, but it is rather difficult to get it). Next, we lay a layer of filler, and lay a decorative layer of fabric on top (the one that was the topmost). The final task is to nail the decorative layer to the wood base, keeping an eye on the tension of the material.
Fillers in old mattresses are often already unusable, therefore they must be replaced. as a filler, you can use dense foam rubber, synthetic winterizer or cotton wool.
As we can see, every man who is friends with tools can repair a spring mattress at home. Difficulties can only be caused by the non-standard structure of the mattress - for example, it can contain not only ordinary springs, but also "snakes" to which they are attached from the bottom side. It is more difficult to repair such mattresses, but it is impossible to give universal advice on repair - it requires an individual approach. If it was not possible to repair the mattress and there is not much money to replace it, you might think about purchasing an inexpensive
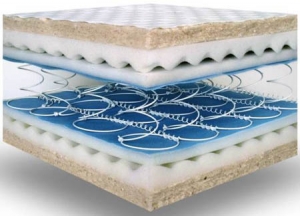
The mattress is a soft bed, which can be with or without a frame. It can be of several types, but in everyday life only two are most often used - spring and stuffed. In our article, we will talk specifically about spring types, which, in turn, are divided into two types.
- With continuous weaving of springs called Bonnel
- FROM independent blocks from springs that are considered orthopedic
The first type is more common. It is inexpensive, therefore it is very popular. The second type has great capabilities, but it also costs more. In any case, this subject matter consists of spring block or cushioning parts, hard layer, cover and filler. The latter can be both soft and hard. As for the cladding, it is better that it be made of natural fabric.
Products of this design can be found in any house or apartment. Many consider them obsolete, but this does not diminish their popularity in the least. And all because of the low cost. Mattress cushioning parts are made from materials such as hardened high carbon steel. They are connected to each other using a wire. The main disadvantage of this type of bed elements lies in the fact that they have extremely low orthopedic properties. This is because when you lie down on the bed, not one spring responds, but all at once.
Mattress with independent springs
This type has a higher level of comfort. Springs for them are made of the same steel, but their diameter is smaller and the number of turns is larger. These elements often resemble a cylinder in shape. Sometimes their edges can be narrowed. The advantage of this type is that the springs are not fixed to each other. This improves orthopedic effect... After all, each spring reacts to pressure independently of the others.
When a mattress needs repair
The quickest thing is that the outer covering of spring mattresses becomes unusable. But the fillers for them are made of high quality materials that have a long service life. The average service life of a spring product is fifteen years. When it loses its functional parameters, then you should not immediately throw it away. It is not so difficult to bring the product into proper form. There are several reasons why the mattress is in need of urgent restoration methods.
- Damage to the skin
- Deformation of flexible elements
- Filler wear
- Violation of construction
But this list can be expanded with a more scrupulous examination of this item. To repair a spring mattress with your own hands, there is no need for special knowledge and skills. You only need to carefully follow the advice of more experienced professionals.
Stages of the recovery process
The work of bringing an old mattress back to life can be divided into several main stages.
1) Disassembly
2) Cleaning
4) Bringing damaged parts into the correct position
5) Reliable strapping of shock-absorbing parts
6) Checking parts that have been repaired
7) Product casing
Materials and tools
To return a worn product to its proper appearance, you must use the following materials and tools.
1) New decorative cladding
2) Lining fabric
3) Padding material
4) Hammer
6) Furniture stapler
7) Wooden lath
8) Strong yet flexible lace
Stage 1. We clean and inspect the subject of repair
In the process of active use of the product, quite a lot of small debris, that is, dust, collects inside it. That is why experts recommend disassembling on the street. If this possibility is not considered, then you will need a vacuum cleaner. With its help, all surfaces of the spring product must be thoroughly cleaned. It is advisable to remove all furniture and carpets from the room in which the repair process will take place. As a last resort, cover everything in the room with oilcloth or similar material. Place the garment on four stable benches with the decorative paneling at the bottom. This will allow you to approach the subject of repair from all sides. Pull all fasteners out of the mattress very carefully. After that, you need to remove the upholstery and seal. The fabric that covers the springs must also be removed. Clean all elements with the utmost care.
Stage 2. Inspecting the details
You must free the springs from the straps. After that, you can start pulling out the nails from the base. It is them that the manufacturers use to secure the straps. Now you need to bring all the spring elements to a vertical position. Be careful! All springs must be of the same height. All parts that are loose or come off altogether must be securely attached to the slats with nails. Note that if the mattress springs are attached with straps, then these straps must be removed. And the spring parts are fixed using nails.
In general, all straps in our facility must be disposed of. It will be better if you use regular slats instead. The latter should have a length equal to the width of the mattress. To fix them, you need to make preliminary markings on the body.
Stage 3. We fix the slats
Before you get rid of the frame fastening tape, mark the places where the tape was placed on its surface. After that, you need to carefully remove the nails and remove the old straps. Now you need to prepare the slats of the desired size. Then, according to the markings made, you must carefully cut out the grooves for them. After that, the slats are very carefully nailed from both sides to the base. Then you can set the spring elements to their previous position. Fix them with studs if necessary. The latter are folded on both sides to ensure high fastening reliability.
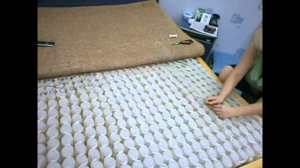
Stage 4. We tie the springs
When the springs are securely fixed to the frame, you can start strapping them. You need to drive nails against each row of springs. You need to fold them into hooks. At this stage it was the turn of the laces. It is with their help that the strapping will be carried out. First, start with a cross row. First, you must tie the outermost springs to the hooks. After that, tie the entire longitudinal row in the same way. In the process, the lace is also attached to the transverse laces. Finishing the process, you must sew diagonally. When the tying process is completely finished, you should bend the studs all the way to the base.
Stage 5. We proceed to the cladding
Before starting the process of covering the mattress with lining, you must make sure that all important parts are installed correctly. When everything is checked, you can take up the sheathing. To do this, use a furniture stapler. Place a gusset in the corners to provide additional protection. Then fasten the rollers to the backing base. They can be made from the material used for the seal. Ensuring reliability, the seal must be attached to the lining in several places at once. On top of all this, decorative fabric is pulled, which is firmly fixed with the same stapler. Remember to gently pull up the edges of the fabric to avoid holes or creases.
As for the orthopedic spring mattress, resting on it is not only comfortable, but also useful. But such a product also does not last forever and can wear out. But don't rush to buy new mattress... It is possible that the old one can still be renovated. The repair of the orthopedic product is carried out in the same way as the usual one.
That's all. A product updated and repaired in this way will serve you for many more years. The mattress repair process does not require a lot of money from you. But the acquisition of a new one can cost you a pretty penny.
How to extend mattress life
It is clear that one mattress is hardly enough for your whole life. Over time, he will still need repairs. But we note that the moment when there will be nowhere to go, you can postpone a very decent period. To do this, you need to use this piece of furniture with maximum care. Try to avoid situations that could damage it.
- You need to buy a mattress according to your weight
- Don't let kids jump on the bed \\
- Never eat or drink while lying on bed
- Be sure to let the item dry and ventilate in the fresh air at least once a year
- The mattress should only lie in the places designated for it
- To prevent the decorative upholstery of the mattress from getting dirty, use additional removable covers
If you carefully follow all these simple rules of operation, then your mattress will serve you for many years, and it will take a long time to repair it. This ensures that your sleep will be healthy and sound.
The article was prepared with the help of specialists from the "Sleep Laboratory".
Website: http://sleep-lab.ru/ - Online store of mattresses.
Video. Repair of a spring mattress
Video. DIY mattress repair and hauling
I suggest you see what you can do with the things that we usually throw in the trash. At the end you will find several simple master classes.
Although the summer season has already passed and everyone began to warm their homes together. I'll start with the summer theme ...
An option for how you can decorate your summer cottage and make flower pots out of plastic bottles and old shoes by painting them with gold paint. It looks not only original but also stylish.
Summer residents do not throw away old shoes; they may still serve you.

And this is an option in the interior. Most likely there are decorative shoes, but the bag is definitely real!

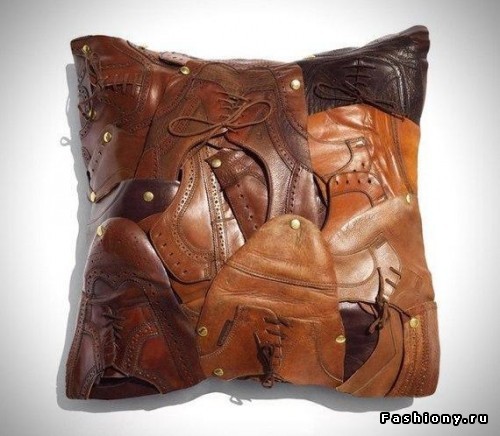
The pillow is made from old leather shoes. It turned out very pretty. But where can it be attached from rough leather?
And this is a rework from an old carpet and shoes ... cute too. But already for craftswomen with "golden hands"

Alterations from men's ties.
Whoever has a collection of old ties in the house, inherited from grandfathers and dads, do not throw them away. They will still be useful to you!
Here are some ideas.


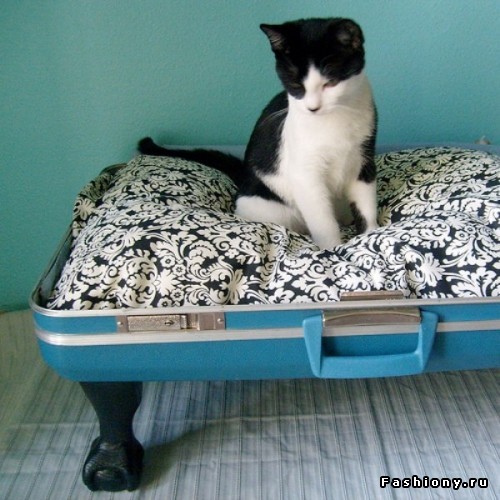
From old suitcases.
suitcases are also a necessary thing in the house ... our pets love them very much. It is enough to put a pillow in the suitcase and you get a bed for the cat.
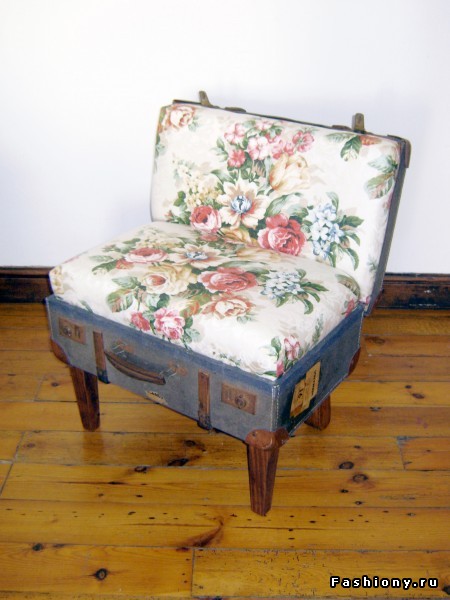
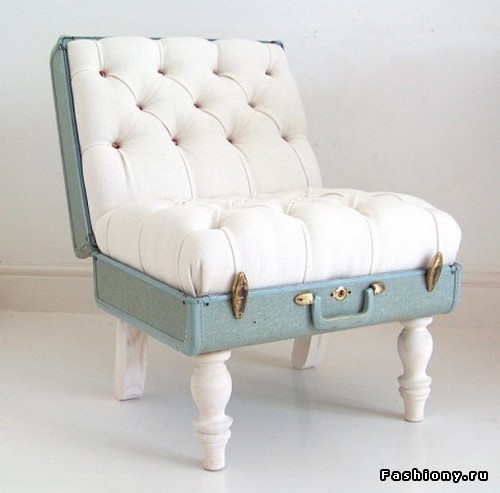
and also beautiful flower beds are made from old suitcases.

Discs decorated in decoupage style and with drawings look very stylish in the interior


A lamp made of discs and a Christmas garland looks fantastic

This is a table made of bottles using decoupage technique.


There was a lot of material about clothespins on our website.
But I'm not afraid of repetition. I liked this idea.

From the plastic pipes that you have left after repair, you can make such interesting storage shelves.
This is done very easily. Pipes are cut to the required length and glued back with construction tape. If desired, you can paint.


A high-quality mattress can delight you for more than 10 years, but one day you may realize that it needs repair and hauling. The most vulnerable part of the product is the casing, internal filling suffers less, although the springs periodically need to be repaired too.
If you notice that your mattress has ceased to meet the requirements, the springs are deformed, a creak has appeared or the structure as a whole has become different, do not rush to get rid of it. You can restore the product with your own hands, resorting to a number of proven actions.
Reasons for repairing mattresses
The main reasons why it is easy to understand that a piece needs restoration can be summarized in one list. If the following problems are addressed in time, the mattress will last longer. Restoration is required when:
- The skin is damaged;
- The springs are deformed;
- The filler is worn out;
- The structure was broken.
Also, during a preliminary inspection, you can find other troubles that are quite easy to eliminate with the help of repair.
Stages of repairing a spring mattress
If you decide to repair this model with your own hands, you first need to disassemble it. This should be done outdoors, since enough dust has accumulated inside over the long years of operation. As a last resort, vacuum it well, otherwise it will be impossible to restore it.
The mattress must be turned so that the top paneling is at the bottom. In this position, you should start removing the seal. Remove the staples and upholstery so you can get to it without a problem.
Then the springs will open in front of you. They have special fasteners - straps fixed with nails. It is necessary to pull these nails out, and remove the strapping. The springs are then carefully inspected for deformed or torn pieces. If any are found, correct the situation by nailing them to the slats.
Do not be embarrassed that initially the spring mattress has fastenings in the form of straps, straps, if you are repairing a spring mattress with your own hands, you will have to use nails and a hammer. Sometimes the design does not have slats, but the belts in it are not suitable for high-quality repairs, so feel free to change the belts to slats. Accordingly, their length should be equal to the width of the mattress.
Tying the springs is simple, you just need to fix the nails parallel to each row, bend them and tie the springs with a strong cord. Work the transverse rows first, and then the longitudinal rows.
Make sure that all parts are tied and not wobbly. After that, you can proceed to the next step of repairing the spring lounger with your own hands, namely, its casing.
DIY sheathing of the product
Re-evaluate the springs, it is important that they are all strictly on the same level. Then use the upholstery fabric. In difficult places such as corners, the fabric must be folded into a corner and stapled. Place the material on the entire surface of the product and, using a stapler, attach it to the mattress.
A soft seal is attached to the lining. Almost any material that meets the requirements is suitable for this. It is laid in several parts, and then pulled decorative fabrics... Again we take a stapler in our hands, and with its help we connect the layers. Take care not to leave folds or creases in the lining, sealant or outer skin.
In addition to decorative trim, you can make a cover. It is not at all difficult to make it with your own hands, it is convenient to wash it, it is easy to put it on or take it off from a spring mattress. Correctly measure the parameters of the product, not forgetting the thickness of the mattress, get the right fabric - it is better if it is pleasant to the touch, but practical - and start sewing.
You don't need any special knowledge to understand how to repair a spring mattress. The main thing is to follow the given algorithm, do not forget to inspect the product and treat it with care. If the thing is too old, all the springs are practically out of order, and the casing has burst and lost its attractive appearance, you can buy a new product or try to restore its former beauty with your own hands.
New articles
- "The Appearance of Christ to the People" Ivanov Impression of the picture the Appearance of Christ to the People
- "The human and fantastic world in the story of Turgenev" Bezhin lug Mystic in the story of bezhin lug
- Images of peasants in the poem "Who Lives Well in Russia
- “Why I like Andersen's tales Why do you think everyone loves Andersen's tales
- Characteristics of the hero Raskolnikov, Crime and Punishment, Dostoevsky
- Why Tolstoy couldn't write a novel about the Decembrists
- The meaning of the name of A. Ostrovsky's drama "The Thunderstorm". Composition: The meaning of the title of the drama by A.N. Ostrovsky's "Thunderstorm" The originality of the drama "Thunderstorm"
- Characteristics of Plyushkin in the poem "Dead Souls": a description of appearance and character All about Plyushkin from dead souls
- "Little Tsakhes, nicknamed Zinnober" by Hoffmann: description and analysis of the story. Problems of the short story.
- The play "Thunderstorm" and its heroes
Popular articles
- Class hour "We are different, but we are together" (4th grade)
- Description of the manilova village in the poem "dead souls"
- Friendship of Bazarov and Arcadia briefly quotes
- Prisoner of the Caucasus analysis of the work
- The composition "The moral problems of the story A
- Pechorin and Grushnitsky: characteristics of heroes
- Gogol "The Inspector General" - analysis
- Interesting facts Grigory Melekhov analysis of the hero
- Composition: description of painting A
- Overcoat - analysis of the work Analysis of works of art n in gogol overcoat